Top Tools for Your Home Bike Shop

It’s the middle of January, which means most trails are currently under snow and the only thing you’re riding these days is a spin bike or a trainer. Not much fun if you ask me. Soon the trails will start melting off and things will dry out, and we’ll all pull our bike from the garage and find that it needs some love. At Chasing Epic, we build all of our new demo bikes from the ground up each spring, so our work is about to begin as well.
Every real mountain biker should have a basic setup in their garage (or basement, or shed, or back yard) that allows them to maintain their prized possession and keep it operating smoothly for their defined riding season. The tools aren’t expensive, and it’s much more rewarding to work on your own bike- besides, if you work on (or build) your own bike, chances are you can fix it when something goes wrong on the trail. Add up a few trips to your local shop and chances are it’ll total more than all of these tools combined.
Here’s our list of the top “must have” home bike shop tools:

Allen Wrench Set
Absolutely mandatory. This is the most essential set of tools you’ll ever use when it comes to working on bikes. Whether it’s in our garage setup or in the toolbox on a Chasing Epic trip, we always have a full set of allen wrenches. These will help you tighten and adjust almost everything on a bike including pedals, headsets, stems, bars, derailleurs, pivots, and almost anything else you can think of. We recommend buying both the “inch” and “metric” sets because hey, the US is weird and we come across both standards these days. $20 will buy you a solid set that will last for a long, long time.

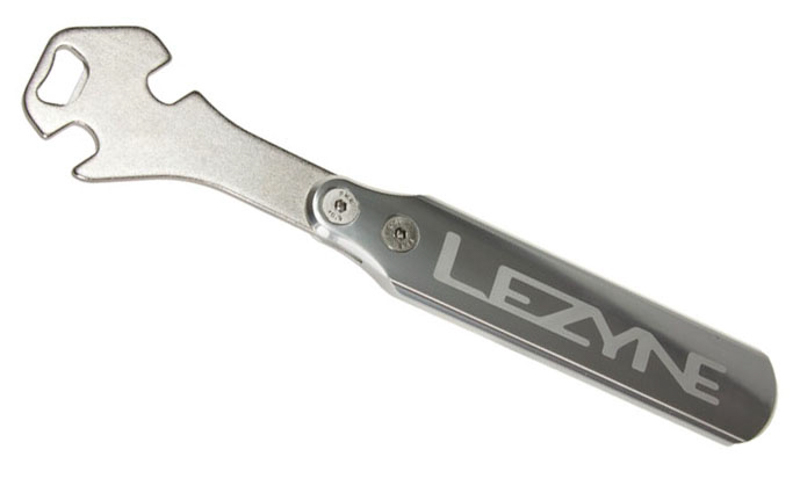
Cassette – Bottom Bracket Tool
Two tools in one! Removing (and cleaning) a cassette and your bottom bracket are two things that should be done regularly, especially if you want to keep that machine running smoothly all year long. This two-in-one tool from Feedback Sports makes it even cheaper to do! One side allows you to loosen and tighten a standard threaded bottom bracket, and the other allows you to work on the lock-ring for your cassette. Now you have no excuse when you hear grinding in the spring when you’re riding on muddy trails; it’s only around $15.

Chain Breaker
Let’s be honest, you should replace your chain (and cassette) every year if you’re not getting a new bike. Chances are it’s stretched to the point of breaking soon anyways, plus we all want a new toy to play with and install. A simple chain breaker will help with the process, and it’s a great life-saver to have with you on the trail. Most multi-tools have one built in, but we recommend spending an extra $10 to have one dedicated to your work space.

Powerlink Tool- aka MLP-12
OK, first we’ll be honest- we will never, ever use a mountain bike chain that’s not equipped with the SRAM Powerlink. It makes working on chains SO much easier than the standard Shimano replacement system. Sure, you can remove a Powerlink with your fingers, but why bother? This $12 tool from Park Tool makes the process so much easier and faster. Not only does it help you remove the Powerlink, but with the small notches on the outside of the tool’s two tips, it also helps you pop the Powerlink back into place. With the number of mountain bikes we build and work on, this might be our favorite tool of them all!
Pedal Wrench
These days, most flat pedals don’t come with the ease and ability to tighten/loosen them with an allen wrench- which is why we always have a standard pedal wrench handy. Granted, I don’t ride flats personally, but about 30% of our Chasing Epic clients do… which means we need to install and remove flats quite frequently. Do yourself a favor and have one of these around- for $15, it’s a no-brainer.

Chain Whip
Remember that Cassette Tool we told you to buy above? Well, it won’t do you much good without a good ‘ole chain whip. This tool allows you to remove the rear cassette- integral if you want to clean or replace it. We find ourselves doing this a lot when we’re swapping wheels between bikes, or when something inside the rear hub needs love. It’s a cheap tool (about $10) that’s always in our tool box.

Torx Wrench Set
Primarily used for the brake rotor bolts, we’re now seeing a lot of shifter and brake levers using Torx bolt heads as well. This set of wrenches will allow you to work on both, and you’ll be glad you have them. We’re always messing around with the placement of our shifter, dropper lever, and brake levers, and this cheap $20 wrench set will give us peace of mind versus using the single piece on a multi-tool. Just be careful when using these, as in our opinion the bolt heads tend to be a little more finicky and you don’t want to strip anything!
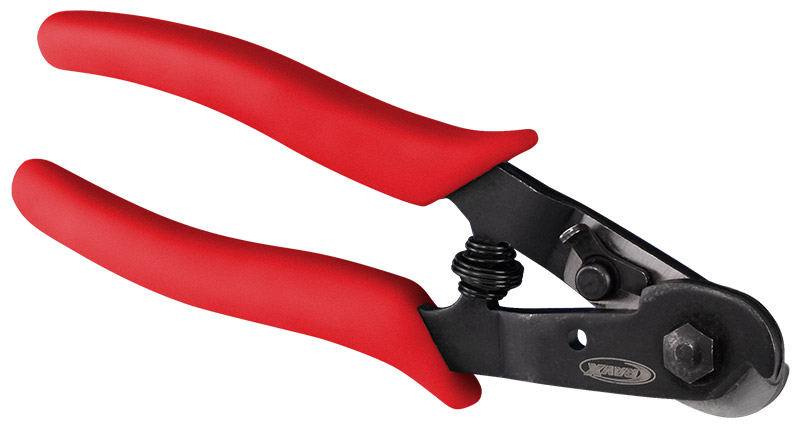
Cable Cutters
We work with shifter and dropper cables all the time- and having a good set of cable cutters is vital. Not only do these cutters allow us to cut the cable to the correct length, but it also helps us get a clean cut. Without a clean cut, cables tend to fray and they may become useless as a result. For $15, it’s a no-brainer and it’s likely cheaper than buying more cables. We also recommend having a good set of pliers or “nippers” you can use to crimp the small cable cap that goes on the at the rear derailleur, since you want that nice and tight to protect the cable from further fraying.

Bike Work Stand
A mountain bike work stand is a high-dollar item (most good ones run around $200), so it’s not for everyone. For years, we got by without one; but now that we have multiple work stands in the home garage, we’ll never go back. We find it absolutely necessary for building bikes and doing serious work like installing brakes, replacing cables, etc. That said, if you’re only doing minimal maintenance and cleaning, save your money and put it towards the tools I’ve listed above.

Air Compressor
Ignore this one if you’re still living in the 90’s and running tubes in your tires. However, if you have a tubeless setup on your mountain bike and want to make things easier on yourself, keep reading. We love our $99 air compressor we bought at Lowe’s four years ago.
It still runs as well as the day we bought it, and we’ve used it to inflate (and seat) hundreds of tires. Sure, you can seat the beads of some tires with a hand pump, and we occasionally do that; but, if you want a sure-fire way to set up your wheels tubeless, then pull the trigger on a basic air compressor. There are multiple bits you can buy to fit Presta and Schrader valves, so make sure you grab the right one. As a bonus, we were able to use our air compressor when we re-did the baseboard molding in our house, so win-win!